
Gouga class Lite Kroozers were one of those things that triggered the "I HAVE TO BUILD ONE!" reflex in me. The ship's rules are at the Armeggedon 3 website if you want to check them out. Basically, Gougas are Ork light cruisers that grab onto an enemy ship, drill into it, and dispense hundreds of warriors into the enemy ship (and NO, I don't think there's anything sexual about it).
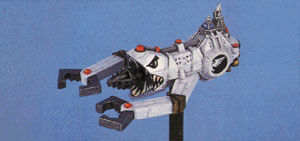 If you're too lazy to convert anything (this is, admitedly, a rather difficult conversion), let me give you a quick tip: the Dominator Class Battleship from the old "Space Fleet" game makes a perfect gouga as you can clearly see (the paint job on this particular model even makes it look Orky). The trick is finding them, as GW doesn't currently have them in their Spacefleet archvies (try calling up UK mail order and begging a bit).
Otherwise, here's a list of parts you'll need for this conversion:
I can see the readers shaking their heads. "What a nutbar!" If you haven't stopped reading, here's how to proceed...
First, file off the gun barrel on the underside of the prow, you'll need to put the boarding drill here later. When you're finished this, cut the Savage Gunship in half as shown. Try to start the cut as close as you can to the "head" of the ship. File down the saw cut edges.
Put the Savage parts aside for a moment and pick up the Combi Weapon from the Mega Armour Ork. This is where things get ugly: you need to saw off the weapon. Yes, it's ugly. No, it's not an easy task. Try to keep as much of the arm as possible and junk the weapon if need be. File the gun arm clean when you're done.
After uttering a few curses, take a look at the Power Claw arm. There should be piece of metal holding the upper claw in place. I recommend that you fashoin this bit into the lower claw (that's what I did). Otherwise, you'll need a third claw bit to complete the model.
Go back to what WAS the gun arm. Take your two power claw bits and figure out the best way to attatch them to the arm. Green stuff always helps, as I said. (cheapie tip: I only used what was in the Ork Mega Armour blister. So, for a second claw bit on the converted gun arm, I used some stopwatch parts. Some of the pieces in the bodies look like claws, so ask your local stopwatch repairman if he has any junk bits.)
Cut the head off the screw. Be careful: if you don't use a tool designed for cutting hard metals you can ruin the tool. Also, you might want to do the cutting inside a bag or cloth, because when you do cut the head off, it's going to go flying off in some random direction. If anyone has any alternatives, I'm all ears.
Take the Lego brick and cut the nubs off the top. Cut out some appropriately sized pieces of plasticard and glue them to the top and bottom of the brick. Underneath, don't cover the middle space, you can insert the stem of your flying base into here. You now have a small plastic box which shall serve as the main body of your cruiser. If you have a bit that's about the same size, you won't have to sacrifice a piece of Lego.
I used some other bits in my box for the engines, but you should be able to use Terror Ship engines instead. Take the tail end of your Savage Gunship and file down the sides until they are flat (you may have to cut some small wings off depending on which hull version you have). Take your Terror Ship engines and glue them to the sides of the tail. Use green stuff to fill in any gaps.
Take another gob of green stuff and affix the beheaded screw to the underside of the Savage's prow. When this is set, glue the Savage's prow and tail to the Lego brick. Glue the Kroozer Gun Turrets to the sides near the rear, and the Arms to the sides, near the front.
You can leave the top of the main body bare, or you can stick some Imperial/Chaos cruiser stuff here (eg: bridges and antennas) or any other bit you think might be appropriate.
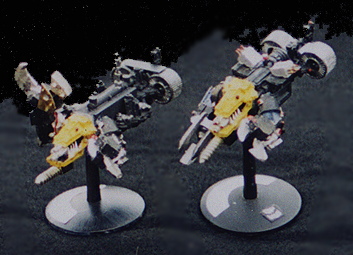
Assuming you haven't gone mad trying to glue new things on before the old ones have set, you should now have something simillar to what I made. This is a very difficult conversion, consider yourself Andy Chambers-like.
| Battlefleet Gothic, Warhammer 40K, Fanatic Games, and all other registered marks herementioned are property of Games Workshop Ltd. All Warhammer 40K universe characters, images, and related marks on this and all linked pages are the property of their respective owners. Blackstone Six fully supports the Intellectual Property Policy published by Games Workshop. This site and all affiliated materials are in no way, shape, or form associated with Games-Workshop Ltd. or any of it's affiliates. Blackstone Six is for non-commercial purposes only. Any misuse of copyrighted materials is purely accidental. |
|
Site idea, layout, design, programming and original images are the property of Outpost 10F and it's affiliates. No part of this site may be duplicated or copied without the explicit permission of Outpost 10F and Blackstone Six. Blackstone Fortress image rendered by Commissar Sonata Form. All HTML layouts and javascripts © Blackstone Six. Site founded by Commissar Sonata Form and Lord Admiral Acoron in July of 2001. |
| © Outpost 10F (www.outpost10f.com) 1997 - 2001. All rights reserved. |